Author Archives: jay

What are the correct name servers (DNS) for my domain?

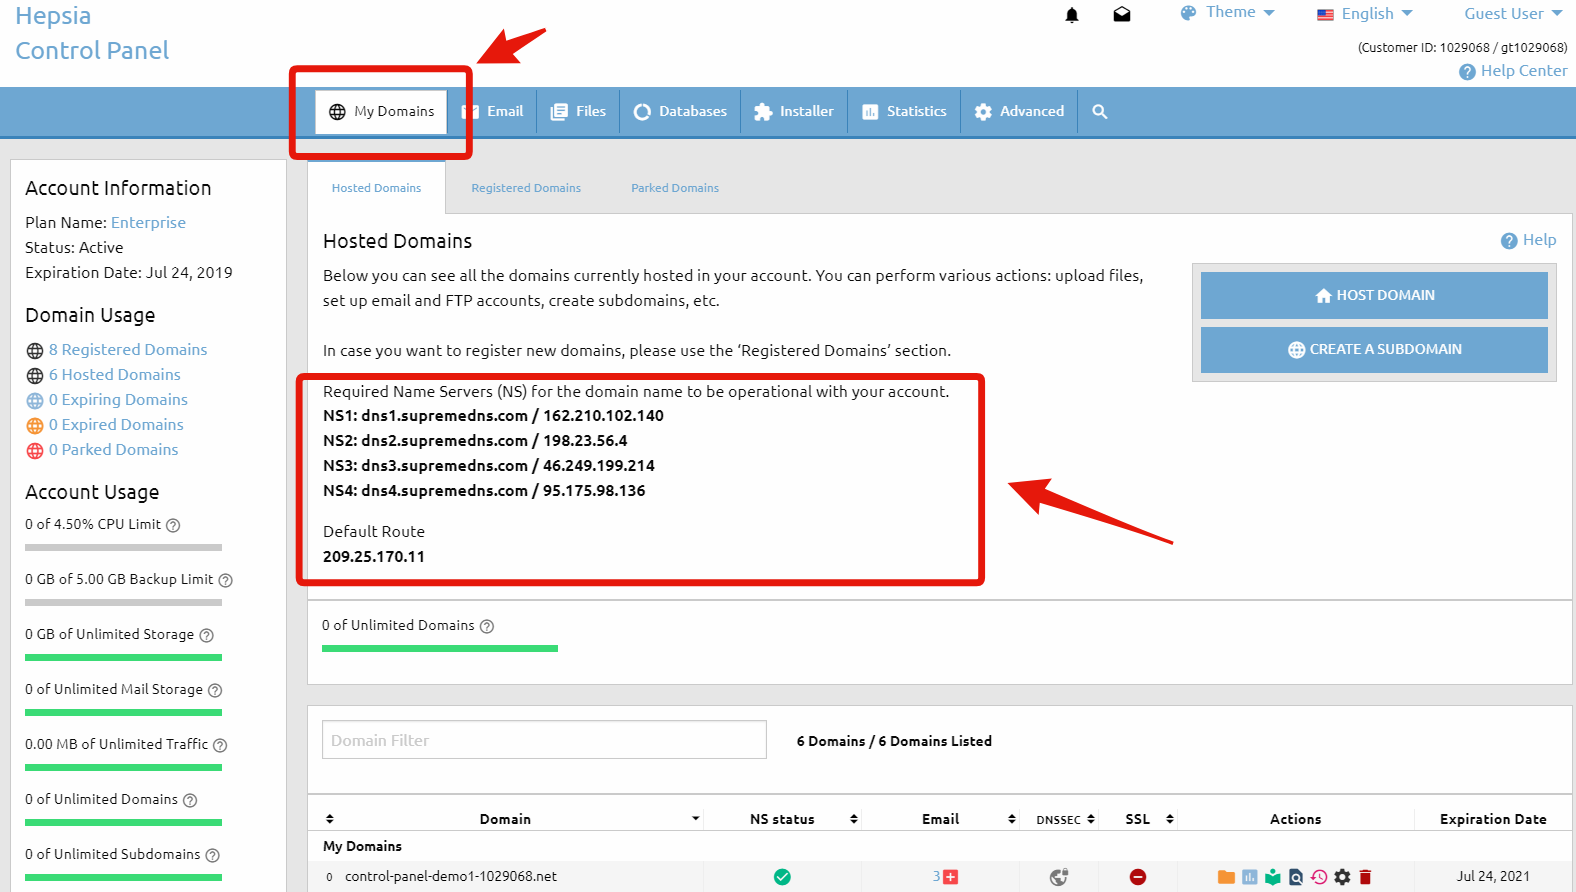
If you wish to host a certain domain name in your account with us, our name servers must be assigned for it so that it works properly. You can easily find the correct name servers that you need in the Hosted Domains section (My Domains > Hosted Domains) of the Web Hosting Control Panel. They are displayed on the left side, above the table that lists all the domain names that have been added to the Hosted Domains section.


correct name servers

If the domain name that you want to host with us is also registered with us or has been successfully transfered to us, you can change the name servers for the domain name via the Domain Manager section (My Domains > Registered Domains) of the Web Hosting Control Panel. For detailed instructions how to do that, please see the article: How to change the Name Servers of a domain name?.

If your domain is registered with another company, you must change the name servers at their end. There should be a Control Panel to manage the domain name and the name servers listed in the Hosted Domains menu must be applied to your domain. If you cannot find such a menu or you experience any problems changing the name servers, you should contact the customer support staff of the company that has registered the domain name for you.

IMPORTANT: Apart from changing the current name servers with ours, in order to host a domain name in your account it must be added to your Hosted Domains. For detailed information about hosting a domain, please refer to the article: How do I host a domain name?.

What is a mailing list?

In a broader perspective, the mailing list is a group of names and addresses that can be used for distributing materials such as newsletters, periodicals or advertising.

In the light of our web hosting services, the mailing list is comprised of email addresses that can be reached by sending a single message to the address of the mailing list.

There are two general types of mailing lists. The first one is the announcement list, which is closer to the original meaning of a mailing list where a group of people are recipients of the same materials.

The second one is the discussion list and its name suggests that all the members of the list can use the list to communicate with each other.

The use of mailing lists nowadays is quite common and it has many applications.

For example, in a given organization each department may have a separate mailing list to share information – tasks, results, etc.

Or, for instance, customers of an online shop may want to receive updates when new items are posted.

Another advantage to using a mailing list with our services is that the hourly limit of outgoing emails does not affect the mailing lists.

How do I reduce the CPU usage of my hosting account?

The CPU usage involves the Central Processing Unit(s) of the web server where your account is hosted on.

Each hosting account has a CPU usage limit, which, when reached, may result in the account being suspended.

You can monitor the CPU usage stats for your hosting account at any given moment from the Statistics -> CPU Stats section of your Control Panel.

You can compare the current CPU usage with the allowed limit for your account, which you can see in the Account Usage table (located on the left side of your Control Panel).

To reduce the CPU usage of your account, there are several general rules you should follow:

  • Upgrade all third-party web applications to the latest stable release available (Joomla, WordPress and any other content management or blog systems, forums, galleries or any other scripts that you have installed)
  • If any of the web applications that you use have addons or plugins, make sure they are upgraded to the latest availble versions as well
  • Remove any unused web applications and/or plugins/addons that you have installed
  • Activate caching for any web applications that you use that have this option
  • If you have developed your script(s) yourself, try reducing the number of MySQL/PostgreSQL queries and optimize your scripts to use less processing time.

If you need to deal with a high CPU usage problem and reduce the CPU usage, you must first identify the reasons for the high CPU usage.

Unfortunately, this is often quite difficult, especially if you are using third-party web applications such as forums, content management or blog systems, etc. that you have not developed yourself and have little or no knowledge at all about their inner working.

Here are a few recommendations you could consider to get an idea where to start from:

  1. Identify the website that is most likely to be responsible for the high CPU usage.
    If you host more than one website (domain/subdomain) in your account, start by identifying which one is most visited and which one generates most traffic – this is probably the one that’s responsible for the high CPU usage. Go to the Statistics > Traffic Stats section and find out which of your hosts (domains or subdomains) has generated the most traffic for the past day and for the current month.
  2. Identify the file that is most likely responsible for the high CPU usage (if any).
    Once you have established which website has generated the most traffic by visiting the Statistics menu, go to the Statistics > Traffic Stats section of your Control Panel and view the traffic stats for this domain/subdomain for the current month. Look for the file(s) that have generated most traffic – you can find them in the Top 10 of XX Total URLs By KBytes table. Look for any PHP/CGI files in this list that have generated unusually large amounts of traffic. This file(s) is most likely the reason for the high CPU usage and you should consider optimizing it.
  3. Identify the visitor/bot that is most likely responsible for the high CPU usage (if any).
    Like in step 2, look at the monthly traffic stats for your domain/subdomain and look for the visitor/host that has generated most traffic this month. You will find the list under Top 10 of XX Total Sites By KBytes – look for any hosts that have generated unusually large amounts of traffic (compared to the rest) – it would either be an IP address or a hostname of the kind botname.some-domain.com. You may want to block the access of this host(s) or at least restrict it to reduce the CPU usage of your account.

If you are still unable to reduce the CPU usage of your account, you should either look for the help of a professional developer or simply consider a either a dedicated server or at least a VPS or a semi-dedicated server.

Are Microsoft SQL (MSSQL) or Microsoft Access databases supported?

As a customer-oriented company, we strongly believe that the quality of our services should exceed clients expectations at the lowest possible price.

On account of this, our management team decided to have all our servers running on the open-source platform called Linux – an Operating System that has gained tremendous popularity in the last several years among desktop users, as well as impressive growth on the server market.

This in turn has attracted more interest in the development of reliable and inexpensive (free, in most cases) products ranging from desktop applications and office suites to high-end database solutions.

The MSSQL and Access databases, developed by Microsoft, run exclusively on Windows-based servers, such as Windows Server 2003 and Windows Server 2008.

To be fair, there are applications that could theoretically provide MSSQL and Access support under Linux with questionable results and none of those meet our quality standards.

The alternative our company offers is MySQL – the fast, cross-platform database from ”MySQL AB”. Its portability means that you can use it on a variety of Operating Systems – Windows, Linux, Unix, Apple XServe, IBM mainframe, and many more.

If you have already developed your application using a MSSQL or an Access database, we can recommend you the following three options for conversion to MySQL:

Option 1: MSSQL2MySQL https://www.mysql.com/why-mysql/white-papers/guide-to-migrating-from-sql-server-to-mysql/

Option 2: Microsoft Data Transformation Services (DTS). Microsoft has included a data manipulation tool within the SQL server. It provides options for data export in various formats and systems. For more information on how to use this feature, please refer to these documents from Microsoft.com:

http://msdn.microsoft.com/en-us/library/cc917688.aspx

http://technet.microsoft.com/en-us/library/ms345120(SQL.90).aspx

Option 3: Similar to Microsoft DTS, Access has its own tool for table export in many formats (including ODBC). All you need to do here is right-click the table in Access and select ‘Export’. A new wizard will appear, guiding you through the conversion process.

I want to create multiple usernames/passwords for a certain directory, how do I do this?

There is a tool that allows you to set password protection for a specific folder. Just go to the Advanced > Password Protection section of the Web Hosting Control Panel.

Click on the New Password Protected Area button.

Select your domain from the “Drop-down menu” or type the full path to the protected folder in the “Path” field (e.g. /www/my-best-domain.com/protected_folder). Enter the username and the corresponding login password. Click the Add PPA button to confirm.

If you need to set more users, repeat the above steps, just use different usernames.

IMPORTANT: If there is an .htaceess file within the protected folder, the protection would not work, so either remove it or consider another password protection technique.

How to unzip files with the File Manager?

Uploading a lot of files to your hosting space could be a burden if your Internet connection gets interrupted.

Besides, your FTP client opens a new connection for each file in the upload queue, thus taking more time for the files to upload.

The more the files you are trying to upload are, the longer the upload time will be. For that reason, we have included a useful function in the File Manager tool in your Web Hosting Control Panel – unzipping an archive that has been uploaded on the server.

If you want to upload a whole website, you can archive it using a freeware archivator like WinRar or 7Zip.

Upload the file in the corresponding folder, for example /www/my-best-domain.com either via FTP or via the File Manager (Files > File Manager) tool.

Then open the File Manager tool and navigate to the folder where you uploaded the file. You should see the archive that you have just uploaded.

Right Click on the file name – a small window opens, prompting you what you would like to do.

All options are listed in a drop-down menu.

You can open the file with a WYSIWYG editor, a plain text editor or in a browser.

To unpack the archive file in the current folder, you have to select the Extract option.

You can also zip (create an archive) a whole folder by clicking on the Compress icon. The supported archive file types are .zip, .rar, and .tar.gz.

By choosing the Zip/Archive option from the drop-down menu, you can create a zip file of all the files within that folder, making it easier to download the entire folder at once.

How to change the permissions of a file or a folder?

Sometimes when you install a script manually, you would see an instruction “change the permissions of file.php to 666“, for example.

Those permissions are associated with the read, write and execute rights that the file owner, group members and everybody else has for that file.

There are several ways to change the permissions of a file or a folder – through the File Manager section, SSH, or through an FTP client, such as FileZilla.

If you go to the File Manager section of the Web Hosting Control Panel (Files > File Manager), you will see a column “Perm“.

There is a value for every file or folder in your account, with default values 644 for files and 755 for folders.

If you want to change the permissions of a particular file or folder, simply click on the Change Permissions icon from the top list menu or click right button of the mouse. A drop-down menu will appear and you have to choose Change Permissions. A small window will show up and you’ll be able to choose the new value.

If you want to change the permissions of multiple files or folders, you have to select them first, then select the Change Permissions icon located at the top of the File Manager section.

Click on the Change button for the changes to take effect. 

An alternative to using our File Manager tool would be changing the file permissions using an FTP client.

That option would also give you the opportunity to change the permissions of all subdirectories and files within a folder recursively. 

We recommend FileZilla, a freeware FTP client. Here is how you can change the permissions using that client: 

First, connect to your account on the server via FTP to see a list of all the files and folders that you have.

To change the permissions, right-click on a file and choose the File Attributes option. You can type a numeric value or choose the Read/Write/Execute permissions marking the checkboxes.

If you choose the File Attributes option when you right-click a folder, you will see an extra option – Recurse into subdirectories.

You can change the permissions of all the files, all the folders, or both, as long as they are located in the folder you have just clicked on. 

Last, but not least, you can change the permissions via Secure Shell (SSH) if it is active for your account. The command is:

chmod number filename

For example:

chmod 644 example.php

For additional details about SSH – how to activate and use it, refer to this article: What is SSH, how do I activate and use SSH?

How to transfer my emails from my previous provider to you?

Here are step-by-step instructions on how to move your emails from the previous hosting provider:

Option 1: Works in all cases (does not require assistance from your current/old provider)

Set up an IMAP account for each of your mailboxes, using a mail client like Outlook, Thunderbird, etc. 

If you are not sure, ask your old hosting provider what the IP of the IMAP mail server you need to connect to is.

Detailed information on how to set up a POP3 account could be found in the email related articles.

Step 1: Download all your emails locally (including all the folders that you might have, like Sent, Draft, etc.) to your computer using the IMAP accounts.

Step 2: Update the domain name servers (if you haven”t done it yet) to the ones listed in the Hosted Domains section of your hosting Control Panel. 

Step 3: Create all the mailboxes that you will be using via the Email Manager section of the Control Panel.

Step 4: You will now have to create IMAP accounts in your mail client for each of the mailboxes. Please note that the previously created IMAP accounts must remain – do not delete them yet!

Step 5: Once you have the two IMAP accounts for each mailbox, just drag and drop all the messages and folders from the IMAP account with the old hosting provider to the new one. This way you will upload all the emails from your computer to our mail server. 

Option 2 – May requires assistance from your current/old provider

Step 1: Check with your old hosting provider if you can have access to the /mail/ directory. There should be folders for each of your email accounts that you have to download to your computer.

Step 2: Create all the mailboxes that you will be using from the Email Manager section of your Control Panel.

Step 3: Upload all mailbox folders to your hosting account with us, using FTP. The folders could be uploaded directly to the /www/ directory.
Each of your mailbox folders (e.g. mail@my-best-domain.com) should contain the following sub-folders: “cur” and “new”.

Step 4: Go to the File Manager section of the hosting Control Panel and navigate to the directory which contains the uploaded folders from the old hosting provider. 

Copy all the files as follows:
– from /www/uploaded-mail/mail@my-best-domain.com/cur/ to /mail/mail@my-best-domain.com/cur/
– from /www/uploaded-mail/mail@my-best-domain.com/new/ to /mail/mail@my-best-domain.com/new/

If you experience problems – check if /mail/mail@my-best-domain.com/ and the subfolders have permissions 755.

Log into the mailbox and see if the messages were copied successfully.

Repeat the steps for each of your mailboxes.

Anti-SPAM protection – reducing SPAM received in your inbox

For your convenience and safety we provide the option to enable Anti-SPAM protection for any mailbox that you have with us.

This is an automatic protection based on multiple criteria, which can filter all incoming mail and protect your email account(s) from different types of SPAM (including virus-infected mail attachments).

There are 3 options to activate the Anti-SPAM Protection option for a certain mailbox:

OPTION 1: Enable Anti-SPAM Protection for several email accounts.

Go to the Email Manager menu in your Control Panel (Email > Mailboxes tab).

There you will see a list of all existing email accounts.

You can select each of these email accounts (put a check mark in front of it). Above  the list of mailboxes, there are rows with identical buttons – the second one is the Anti-SPAM button.

OPTION 2: Using the icon located in Actions column. If you want to enable the Anti-Spam option for certain mail you must click on the red icon. Once the option is enable, the icon will be green.

Set anti-spam protection

Once you select the desired email account(s) and click on the Anti-SPAM button, you will be forwarded to a page where you will be able to select the level of protection and choose between two SPAM message options – to delete or to forward them to an e-mail address specified by you.

IMPORTANT: The higher the level of protection you choose, the better the chance of rejecting a valid e-mail message that you actually wish to receive will be.

It is recommended that you start off with a lower level or use the option to redirect the SPAM messages so that you can review them manually.

OPTION 3: Go to Mailboxes > Spam section of your Contron Panel and click on the “Activate SPAM Protection” button.  From this section, you can activate and control the Anti-spam protection levels for your email accounts.
Anti spam protection

What is SPF and how can I activate it?

SPF (Sender Policy Framework) is a way to prevent sender address forgery in emails. SPF will not directly stop SPAM (junk email).

It will give domain owners a way to define which mail sources are legitimate for their domain and which ones are not.

To enable SPF for your domain, go to the Email > SPF Manager section of your Control Panel.

Choose the exact domain name you wish to protect and switch the Status to ON from the drop-down menu next to your domain name.

If you’re using our mail service, all you need to do is check the box labeled “Allow my domain’s MX records only” under the IPv6 field—that’s it!

This means that only the MX records stored for your domain name in the DNS zone will be able to send mail on behalf of your domain name.

If not, here are the required settings for each field:

  • Hosts: Fill in a list of all the hosts, which are authorized to send mail on behalf of the chosen domain name, e.g. mail.my-best-domain.com. Separate the hosts with a space or a comma.
  • IPv4: Type in the IP address of your SMTP mail server (e.g. mail.my-best-domain.com). Please have in mind that most of the mail servers have more than one IP address and in order to determine all of them, you can use an online tool like the one at https://www.whatsmydns.net/.
  • IPv6: Leave this field blank.

Once all the above is done, click on the Edit SPF Protection button. Please note that the SPF Record propagation may take up to 24 hours.